It is important to be accountable in all situations (especially when it comes to money)
The same goes for your Facebook ads as well.
That’s the reason I have made a habit of fetching my Facebook ad receipts ( invoices ).
It helps me stay well organized and accountable on the financial front.
I wish the same for you and hence writing this article to let you know the whereabouts of Facebook ad receipts (invoices).
Let’s dive in right away.
A Facebook advert receipt is a receipt that Facebook generates on running your Facebook ads.
It contains details of your transaction like:
Ad account ID
Tax invoice ID
Date
Payment method
Transaction ID
Product type
Amount spent,
Reason for billing,
Campaigns on which money spent, and
Results from your ads
You need to be an admin of the account to access the receipts and manage billing information.
To reach the Billing section, follow these steps:
Open your Facebook ads manager
On the left sidebar, click on the hamburger icon
Select “Billing” from the drop-down menu that appears
Select your ad account for which you wish to view the information
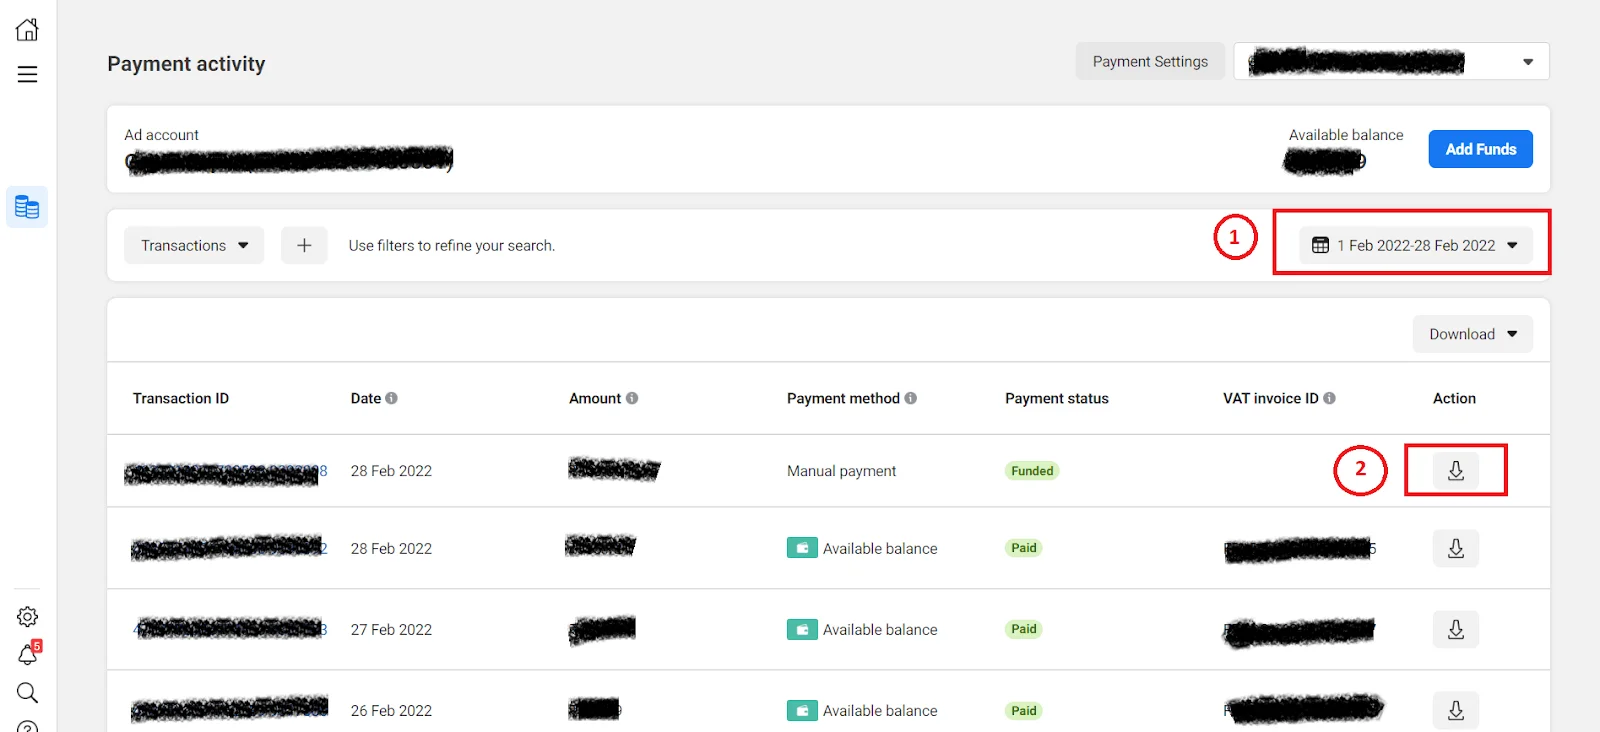
This loads your payment screen and shows the details of all the transactions in a tabular format
The table of transaction details has the following columns:
Transaction ID when clicked, lets you see the transaction details online
Date of processing your transaction
Amount of the transaction, excluding the taxes
Payment method used
Payment status can be either:
Paid: It is the amount spent on your ads.
Funded: It is the amount added to your ad account.
VAT invoice ID, VAT applied to your transaction
Download lets you download the individual receipt.
You can also filter these transactions using parameters like:
Date,
Payment status,
Amount,
Payment method,
Billing reason,
Reference number,
Transaction ID,
Campaign name,
Ad set name,
Campaign ID, and
Adset ID
To get your Facebook ad receipt, visit the “Billing section” from your ads manager (as instructed earlier).
You can then download your receipt from here using either of the following:
For one transaction :
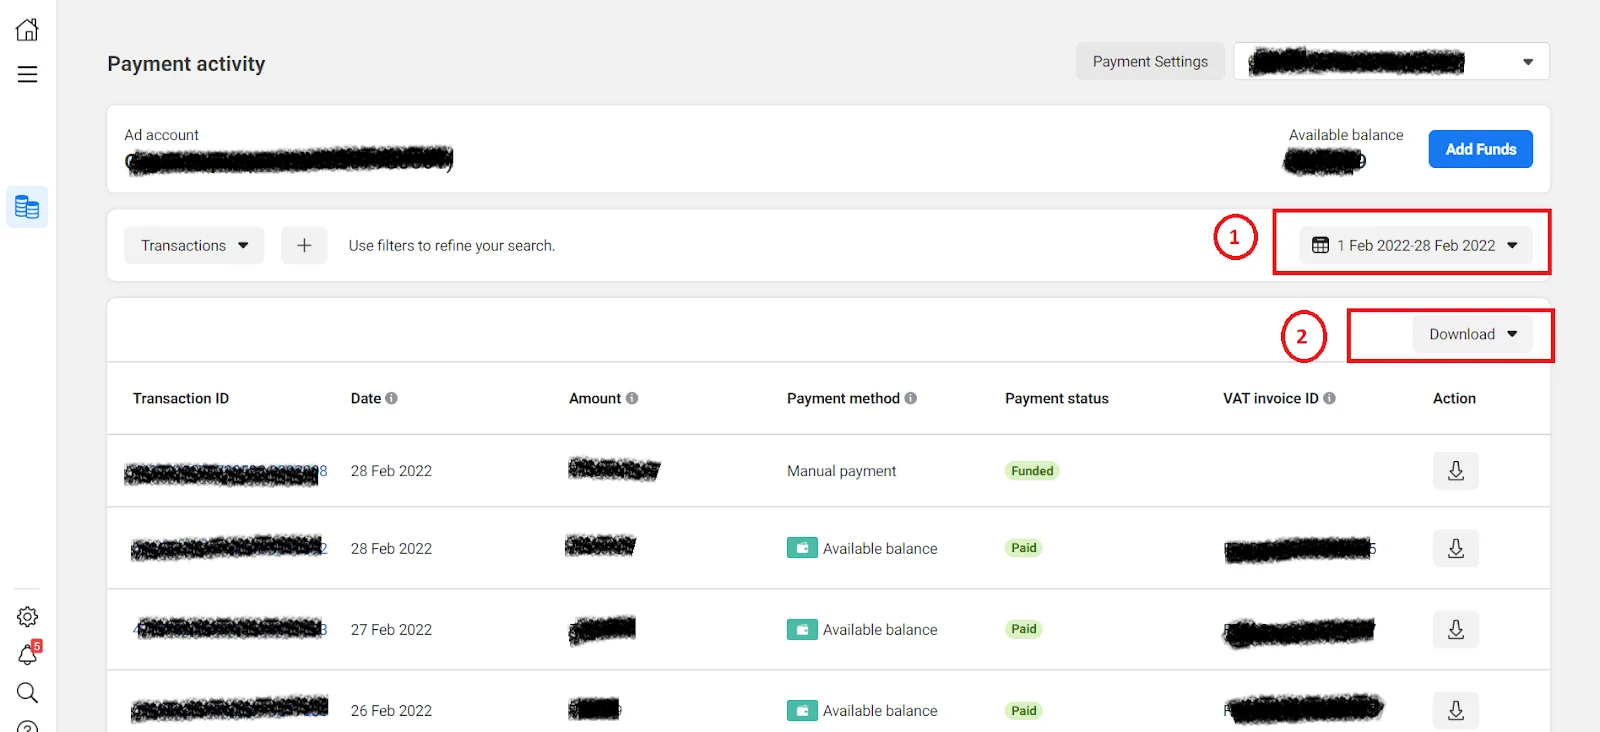
Select the date range
Facebook then loads all your transactions within the period
Find the transaction you want the receipt for, and click the download icon in the “Action” column.

For all transactions or a billing report:
Select the date range
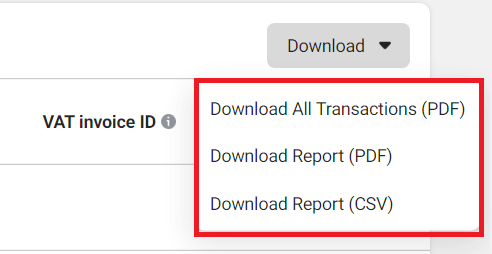
There is also a download button above all the transactions (in the right top corner). Click on it to find below options
A single receipt for all transactions in PDF format
The billing report as a PDF file
The billing report as a CSV file


If you want, you can change the name or address listed on your receipt. Just click on Account Settings in Ads Manager, and edit the information as desired.
Please note that these changes are shown in your future receipts only.
At times, it may happen that you can’t find your ad receipt.
There are a couple of reasons for it like:
Facebook requires 24 hours to process your ad receipts. So probably it has not yet generated your ad receipt.
You have set an incorrect date range for viewing the transactions.
Once downloaded, you can save your ad receipts for future reference. If you find any discrepancies, contact the support team from Facebook for resolving them.
Sharing one such discrepancy that you may come across.
You may notice a difference in the number of clicks/impressions your ad received in actuality vs. your payment receipt.
The reason is that the ads manager shows the total number of clicks or impressions that your ad received. Whereas, your payment receipt shows the actual number of clicks or impressions you were charged for.
Hence there can be a difference of values between the two. So there is nothing to panic about.
Besides the individual ad receipts (invoices) and summary reports, Facebook also provides ‘Monthly Invoices’.
Normally, Facebook charges you for your ads, as and when accrued.
But if your business is eligible for ‘Monthly Invoicing’, you get credit for your ad costs, and Facebook sends you a monthly invoice for it.
This reduces your number of monthly invoices by grouping them all into a single bill.
8 Million+ Ready Automations
For 750+ Apps
To apply for Facebook’s monthly invoicing, you must satisfy the following criteria:
You must be an Admin/ Finance Editor of a Business Manager
Your ad spent for the last 3 months should have been a minimum of $10,000 per month
You can apply for monthly invoicing in 2 ways:
For Business Manager Home Page, follow the below steps:
Go to your Business Manager Home page.
Find the “Now You Can Apply for Monthly Invoicing” section.
Click on “Get Started”.
Fill in all the required details.
Click on “Select File” to submit a company registration or tax document. (It may help speed up the review process)
Click on Submit.
For Payment Methods section follow these steps:
Go to the “Payment Methods” section in your Business Manager.
Click on Add.
Select the “Add a New Payment” method.
In this, select Request Monthly Invoicing.
Click on continue.
Fill in the required details.
Click on “Select File” to submit a company registration or tax document.
Click on Submit.
Once Facebook verifies your legal entity, your application gets instantly approved, and you will get a confirmation email for the same.
But if Facebook is unable to verify, it will contact you in 2 business days.
To avail monthly invoicing, you must meet the following criteria :
You must be the Admin and a finance editor of a Business Manager
You must be the Admin of the Ad account
If you have multiple ad accounts, make sure to switch to the one you want to work on first.
Steps to add monthly invoicing as a payment method to your ad account
Go to your Payment Setting in Ads Manager
In the Payment Method section, click Add Payment Method.
Select Payment Method from Business Manager.
Click Continue.
Select the monthly invoicing option you want to use and then click Continue.
Click Make Primary
This saves “monthly invoicing” as your payment method.
If you wish to change the payment method, you must clear your dues.
Monthly invoicing entails the following benefits:
You get 30 days to make payments of your invoice.
You can set up auto payments linked to your bank account on the set due date.
When granted access, your partner businesses can avail monthly invoicing.
(This is particularly helpful for agencies)
If you opt for monthly invoicing, you can view your payment activity and download your invoices in your Business Manager.
Then follow the below steps to download your monthly invoices:
Open your Business Manager
Go to the “Invoices” section
Click the date drop-down menu and choose the date range you’d like to view the invoices.
You can then download either individual invoices or download all invoices.
I hope this article has helped you understand :
What a Facebook Ad receipt is,
How to get one, and
All about Facebook’s monthly invoicing.
Now that you know about Facebook Ad receipts and invoicing, stay well organized on the accountability front, and this will surely take you miles.