
Thank you for choosing Integrately, your go-to solution for seamlessly integrating apps, constructing workflows, and automating tasks with ease.
This comprehensive help document is designed to assist you in navigating the powerful features of Integrately, making your experience smooth and efficient.
Our goal is to make it easy for you to set up, customize, and automate your workflows.
- Automation workflow: A series of automated actions working together to complete a task, often involving multiple steps and connected apps.
- Trigger: It is the starting point. Something that happens in an app, setting off a chain of automated actions.
- Action: The specific task that is performed in the target app after the trigger occurs.

Now that you know the dashboard and terminologies, let’s explore the 3 ways you can create automations in Integrately:
If you know exactly what you need to automate, just input your requirements into Integrately's AI. It will generate the automation in seconds. Simply activate it, and you're good to go!
Integrately provides millions of pre-built automations that can be set up in just a single click.
To choose from the popular, ready-to-use automations, just follow the below steps:
- Select the apps you want to integrate.
- Integrately will enlist the ready-to-use 1-click automations for the chosen apps, saving you time.
- Simply select the one you need from the list.
- Voila! Your integration is now set up and ready for use!
It’s that easy 🙂
Sometimes, less common automations aren't available in the 1-click list.
Don’t worry! You can easily create your own custom automation. Here's how:
- Choose your apps and navigate to the `create on your own` section.
- Pick a trigger to start your automation.
- Choose an action for what the automation should do.
- Hit the `Go` button, and your integration is all set!
Note: When you connect your app accounts, be rest assured that your credentials are encrypted & highly secure. They can be removed at any time. Checkout our Privacy Policy.
Once you choose the trigger and action for your automation, the next step is to connect your accounts.
The ways of connecting your account to Integrately vary from app to app, the popular ones being:
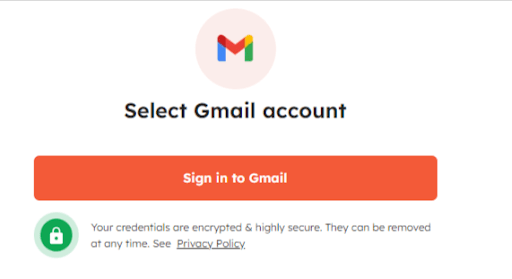
Simply log in with your usual account credentials.
Example: Connecting your Google account for Gmail automation.
If you have already connected your apps with Integrately, just select the desired account from the list.
Note: It is a good practice to assign a name to your connection so that it becomes easy to identify. For example, instead of just seeing "Google Sheets," you could name it "GoogleSheets - Office" or "GoogleSheets - Personal." This makes it clear which account the connection is for.
[Note: There are help videos on the connection page that guide you through how to connect your app using API]
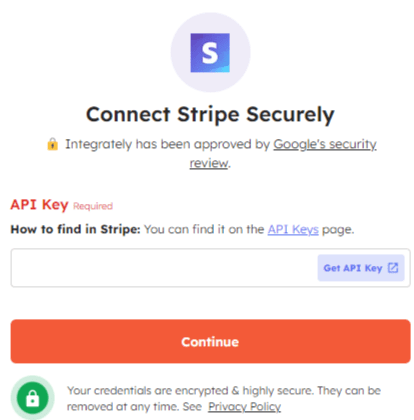
This type of connection uses API keys (a special code provided by the app) to set up a direct connection with the app.
Example: Connecting your Stripe account using an API key.
[Note: There are help videos on the connection page that guide you through how to connect your app using Webhook]
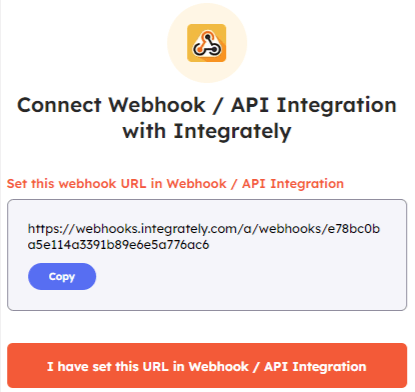
A webhook is like a notification system. When something specific happens in one app (like a new email arriving in Gmail), it can send a real-time message to Integrately, triggering an automation.It basically uses a unique link for your apps to communicate in real-time. Example: Setting up a webhook to trigger an automation from a custom app.
Once your accounts are connected, Integrately will present a screen as below:
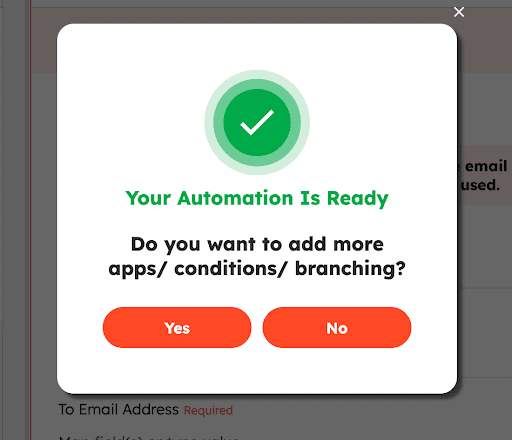
- Select ‘No’ : If you want to create a basic automation (with 2 apps)
- Select ‘Yes’: It will redirect you to the Automation Builder where you can create automations with:
- Multiple apps,
- Conditions,
- Branching, etc
After connecting your accounts, next you need to
- Map all the required fields
- Click the ‘Test and Turn On’ button.
- If there are no errors → Your automation will go LIVE instantly
- In case of errors → You need to resolve them and click ‘Test and Turn On’ button again
Note: To get the solution to your error, click on the ‘How to Fix’ button.
That’s it!
In simple words mapping of fields is nothing but telling Integrately : where to get data from in one app and where to put it in another.
For example: In case you connect a To-Do List app (source) with a Calendar app (destination), you may map the "Title" field in your To-Do List app to the "Event Title" field in your calendar.
Integrately usually sets up this mapping automatically. But you can add more fields or tweak the existing mapping to better fit your requirements.
To do so, follow these steps:
- Click on the field in the destination app for which you want to map the data
- There are 4 ways to map a field:
- Select from the pre-defined list of values
- Map the field from source app or any of the previous steps
- Search and associate i.e search for a value and its associated id will get mapped
- Enter the value manually
- You can also set a fixed value for a field or modify the data before it is passed to the destination app
P.S: You can edit the name of your automation
To rename your automation,
- Double Click the title at the top of your automation or click on the pencil icon
- Assign the desired name, and click the ‘Save’ button
By default, when your automation goes LIVE, Integrately lets you select the folder to save your automation.
You can select whether you want to save the automation in:
- Private folder, or
- Shared folder
Based on your selection, you can choose the destination folder from the drop-down list. Integrately provides widely used folders by default in the ‘Private Folder’.
You can also create your own folders by heading over to the ‘My Automations’ section.
You can perform the following actions on the existing folders:
- Rename : To change the name of folder
- Share : Used in ‘Private Folders’ to move an automation to Shared folder
- Share with : Used in ‘Shared Folders’ to share the automation with others
- Make Default : Marks the selected folder as the default one to save the automations
- Delete : To delete the folder
Important: You can delete a folder only if there are no automations saved in it. For folders with automations, you first need to delete all the automations in it and then delete the folder.
Automation Builder in Integrately helps you unlock additional automation functionalities than merely connecting 2 apps and passing data between them.
You can switch over to the Automation Builder in 2 ways:
- While setting up the basic automation

- By clicking the ‘Add or Modify Steps’ button.

Switching over to the ‘Automation Builder’ helps you :
- Add more than 2 apps
- Apply conditions (Branching)/Filters
- Do different actions in different cases (Routing)
- Change Field Value before sending data to another app (Data Modifiers)
- Change TimeZone/Time
Let’s walk through each one of it:
To add apps to your automation, just follow these few steps:
- Click the ‘Add Filter/Condition/App’ button
- Search and select the required app and its action
- Either select an existing account for the app or connect a new one
- Integrately will automap most of the fields. You just need to map the remaining ones.
- Test the step for any errors, and resolve them.
Mapping data in case of multiple (3+) apps
In case of a multiple app automation, you can map the fields for an app from any of the preceding apps in the automation.
For Example: Suppose you create an automation like:
- When a subscriber is added to a list in MailChimp
- Then create a deal in CompanyHub, and
- Then create a proposal in Better Proposal
In that case,
- For CompanyHub, you can map fields from MailChimp;
- For Better Proposal, you can map fields from either MailChimp or CompanyHub or both.
There are situations where you need to execute different actions depending on certain conditions. You can easily set up such multiple routes in the Automation Builder.
Example: Let's say you want to automate your sales process. When a new lead comes in, you could have the following branching actions:
- If the lead is from a high-priority industry, assign it to your top sales rep on Slack
- If the lead is a returning customer, send them an email about a loyalty discount program.
- If the lead is cold, send them an introductory email campaign.
This level of customization helps you provide a personalized experience and maximize the effectiveness of your automated processes.
When you need to set up an automation with multiple pathways, you need to apply conditions/filters to decide which path to take.
Think of it like 'If...Else' style workflows where each pathway runs based on certain conditions.
For Example: Consider the below scenario
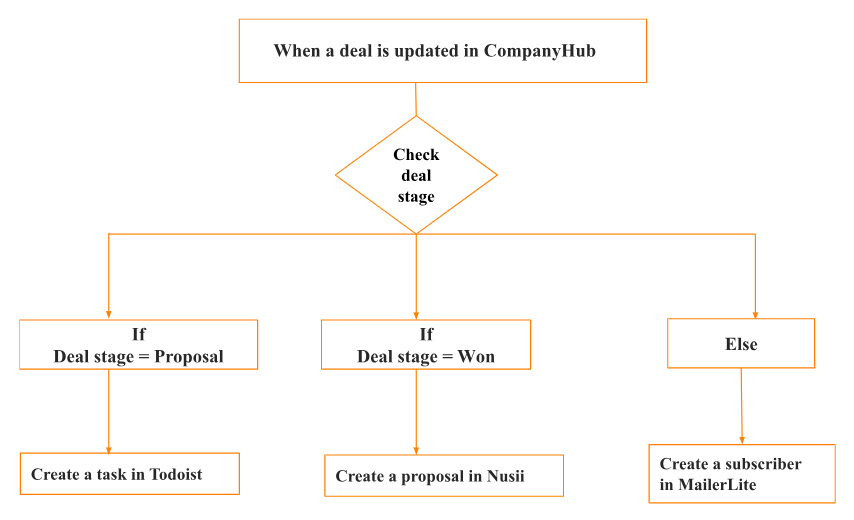
You can set up such automation scenarios using branching:
When you opt for branching, you need to set the filter criteria i.e the condition for which you want the workflow to execute.
Like in the above example: A task will be created in Todoist only if the Deal Stage is Proposal. Here, you need to add the condition ‘Deal stage = Proposal’.
There are several filters provided by Integrately that help you set up these conditions. Let’s overlook them:
- Contains: To check if the `specific field` contains a `particular value`. Example: You can use "Contains" to find email addresses with "@".

- Does Not Contain: To check if the `specified field` does not contain a `particular value` Example: You can use "Does Not Contain" to filter out customer support tickets mentioning `fixed` in the description to avoid reopening them.

- Ends With: To check if the ‘value’ of the specified field ends with a ‘particular value’. Example: You can filter out email addresses ending with `@aol.com` to focus your marketing campaign on users of different platforms.

- Does Not End With: To check if the ‘value’ of the specified field does NOT end with a ‘particular value’.
Example: You can filter out email addresses not ending with "@gmail.com" for a targeted campaign.
- Starts With: It helps you identify items where the value of the `specified field` begins with a `particular value`.
Example:You can use it to find all customer support tickets with a high priority. For instance, you can filter for tickets starting with "URGENT:" to prioritize these issues for faster resolution.
- Does Not Start With: You can use it to exclude items where the value of the `specified field` does NOT begin with a `particular value`.
Example: You can filter out phone numbers not starting with +1 to avoid processing international calls in a US-based automation.
- Exactly Matches : This filter ensures your automation only proceeds if the value in a chosen field perfectly matches a specific value.
Example: You can check for tasks labeled `Priority: High` to focus on urgent tasks
- Does Not Exactly Match : This filter lets you exclude items where the value in a chosen field does not perfectly match a specific value. This can be useful when you want to target records that don't fit a certain criteria.
Example: setting up a filter on the 'Currency' field like "Does Not Exactly Match: USD". This means that if your incoming field value for the 'Currency' field is USD, it won't meet the filter condition, and the automation won't be triggered. But if it’s any other currency than USD, then the automation will be executed
- Is In: This filter allows you to target records where the value in a chosen field is included in a specific list of values.
Example: Targeting customers whose "State" field contains any of the following values: "CA", "NY", "FL"
- Is Not In: This filter lets you exclude records where the value in a chosen field is included in a specific list of values. Example: Exclude employees from a report who belong to certain departments, by listing those department names in this filter.

- Greater than (number): This numerical filter checks if the value in a chosen field is greater than the specified number.
Example: Identify support tickets with a priority level above a certain threshold, and route them to your senior support team.
- Less than (number): Use this filter to target records where the value in a chosen field is less than the specified number.
Example: Use it on your inventory quantity field to trigger an automatic reorder when stock levels drop below a certain value.
- After: The "After" filter checks if the value in a date/time field occurs after a specified date and time. This can help you automate actions based on when certain events took place, like processing orders received after a specific cutoff time.

- Before: This filter checks if the value in a date/time field occurs before a specified date and time. This could be useful for automating tasks that need to be completed by a certain deadline.

- Equals: This filter ensures your automation only proceeds if the value in a chosen field perfectly matches a specific value.
Example: Automating a response to support tickets with status =`Open`
- Does Not Exist: Use this filter to check if a specified field is empty or missing a value. Example: Identify incomplete records and trigger follow-up actions, like sending a notification to fill in the missing information.

- Exists: This filter checks if a specified field contains a value. Example: Searching if the email-id exists in the contact field and then continuing with the next steps of the automation

One of the powerful features in Integrately's Automation Builder is the ability to modify field values before they are passed onto the next step in your workflow.
Let's say you have an automation that starts by creating a new lead in your CRM system. The lead's "Phone Number" field may contain the full international format, like "+1 (555) 123-4567", and you want to pass this data to a calling platform that requires the phone number in a different format.
To do so:
- Add the "Modify Field Value" step right before the destination app where you need the field in a specific format.
- Select the desired modifier
- Map the field to be modified
- Click ‘Save’
Integrately provides 3 types of modifiers:
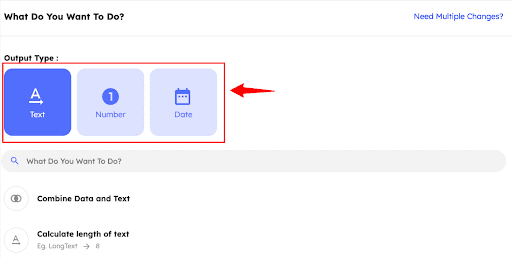
Text Modifier
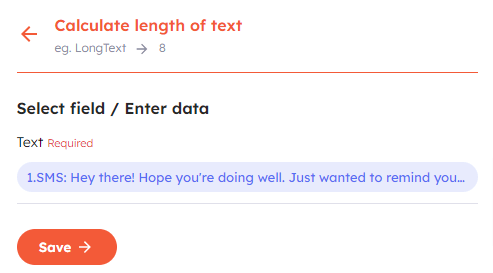
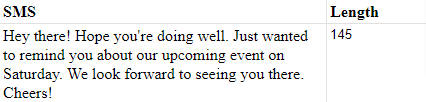
1. Calculate length of textThis modifier calculates the length of the text. It is handy when you want to make sure your text isn't too long for a specific app or service. For example, if you're sending text messages through a service that only allows messages up to 160 characters, you can use this modifier to check and control the length.
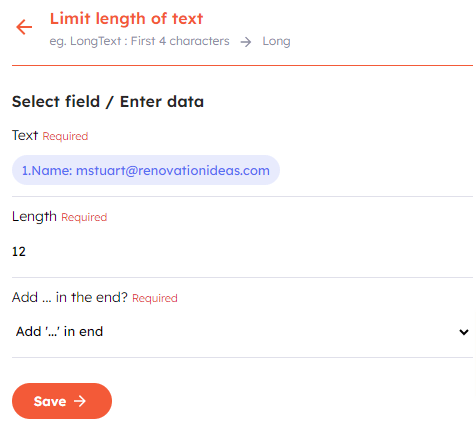
2. Limit length of text
If you want to show only a certain number of characters from the data coming from the source app, you can use this modifier. You can choose how many characters you want to see and decide if you want to add '...' at the end or not.
For example, if you don't want to display the full email address of your contacts in the Google sheet you share with others:

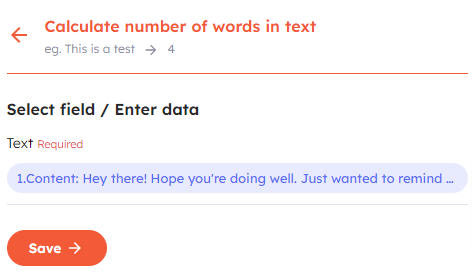
Use this modifier when your destination app enforces a limit on the length of text measured in terms of words. For instance, if you're integrating with a blogging platform that restricts each post to a certain number of words. By applying this modifier, you can efficiently assess the word count of your content before sending it to the destination app.

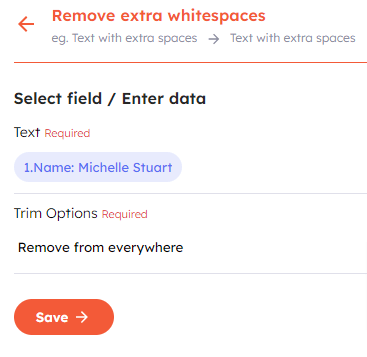
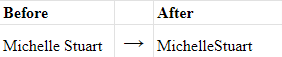
4. Remove extra whitespaces
If you want to remove extra space(s) between words in your data, you can use this modifier. You can choose to remove spaces from all places or just certain positions.
For example, if you have a filename that should match a contact's name, but without any spaces, you can use this tool to remove the spaces.
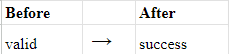
5. Replace one text with another
If you want to change a word before sending it to another application, you can use this modifier. For example, let's say you want to change the word `valid` to `success` when you send an email verification to another application.

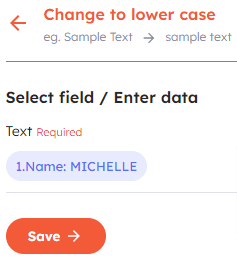
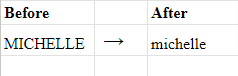
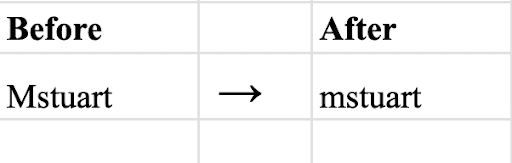
6. Change to lower case
Use this modifier when you want all the alphabets in the data to be in lower case.
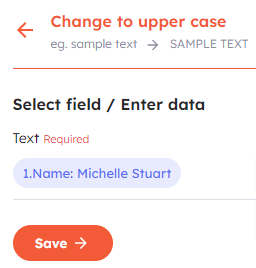
7. Change to upper case
Use this modifier when you want all the alphabets in the data to be in upper case (capitals).
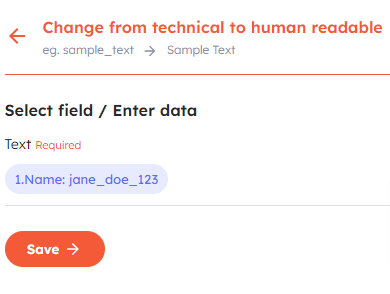
8. Change from Technical to human readable
Suppose your source app stores an employee ID like 'jane_doe_123', but you want it to be displayed as 'Jane Doe 123' in the destination app. So, you apply the provided modifier to the relevant field(s), and it automatically changes the format from 'jane_doe_123' to 'Jane Doe 123' for a more user-friendly and readable representation in the destination app.

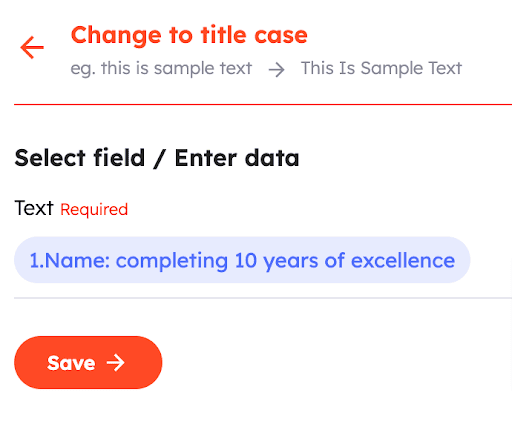
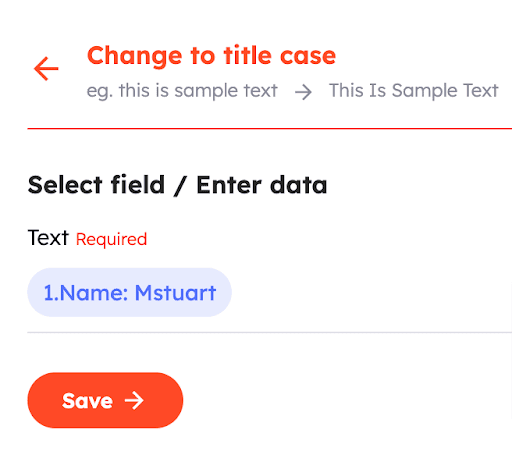
9. Change to title case
This modifier is used to capitalize the first letter of each word. For example, the ‘title’ of your social media post.

10. Change to camel case
This modifier can be used when you want the first alphabet of each word to be in lower case. For example, when creating a ‘username’.
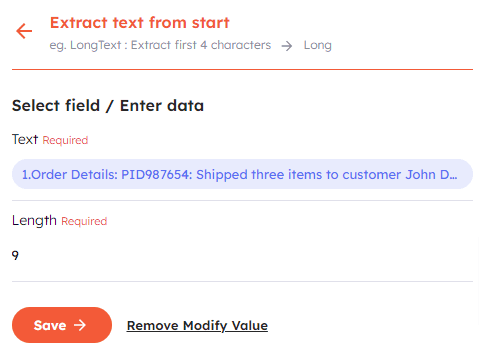
11. Extract text from start
This modifier proves handy when you need to extract a specific portion of text from the beginning to a specified length.
For example: Suppose your incoming data contains product IDs followed by detailed product information, and your objective is to extract only the product ID. In this case, set the length parameter of this modifier to match the length of your product ID, and it will effectively isolate and extract the product ID.

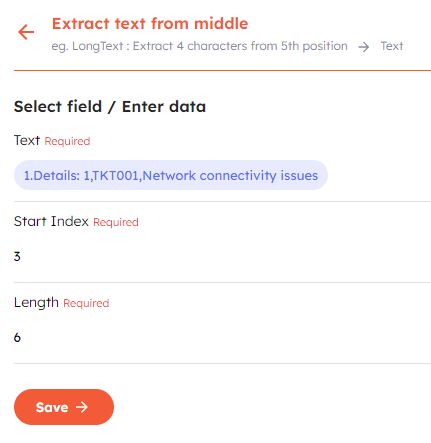
12. Extract text from middle
This modifier comes in handy when you find yourself in a situation where you need to retrieve specific information from the middle of a text.
For Example. if your incoming dataset includes ticketing information such as serial numbers, ticket IDs, and associated issues. If your objective is to extract the ticket ID from this data, you'll need to specify the exact position where the ticket number begins and its length. Once these details are configured, the modifier will precisely extract the required ticket ID

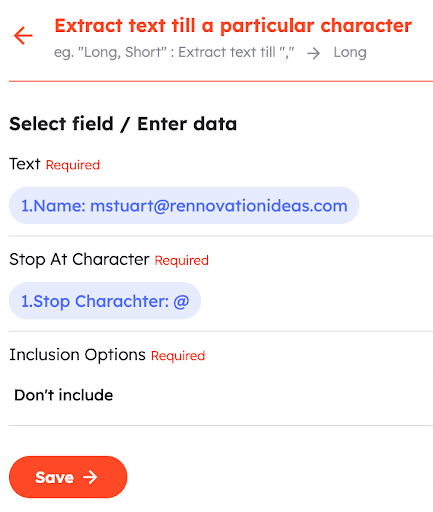
13. Extract text till a particular character
If you want to extract only part of a field from incoming data, then use this modifier. It allows you to specify a specific character that Integrately should look for in the data and extract the text till there. For example, if you want to extract the text before the "@" symbol, you can use this modifier to do that.
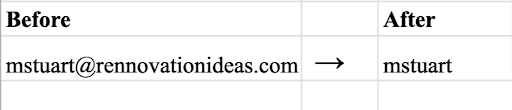
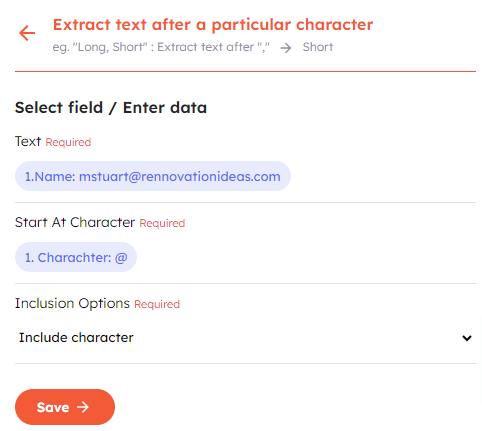
14. Extract text after a particular character
If you want to extract only part of a field from incoming data, then use this modifier. It allows you to specify a specific character that Integrately should look for in the data and extract the text after it. For example, you can extract the text after the "@" symbol in your data
You may or may not include that character in the extraction.

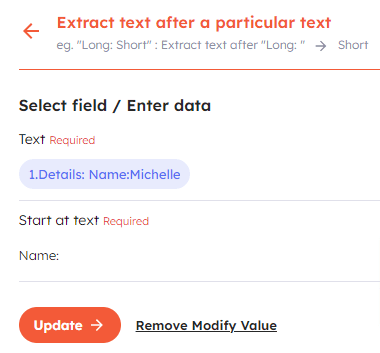
15. Extract text after a particular text
In scenarios, where you want only specific parts of text, you can use this modifier. For example, if your incoming data has `name` along with a label for it, and you need to extract just the name, then you can do so by setting the ‘Start at text’ part of this modifier. In the below case, we will set ‘Start at text’ = ‘Name:’
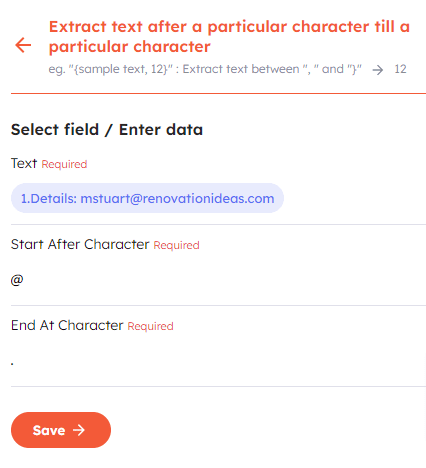
16. Extract text after a particular character till a particular character
Use this modifier when you want to map only some part of the text from the incoming data. You just need to specify the starting and ending characters, and Integrately will extract the text between them.
For example: "[email protected]" -> We can extract the text between ‘@’ and ‘.’ characters by specifying them in the modifier.

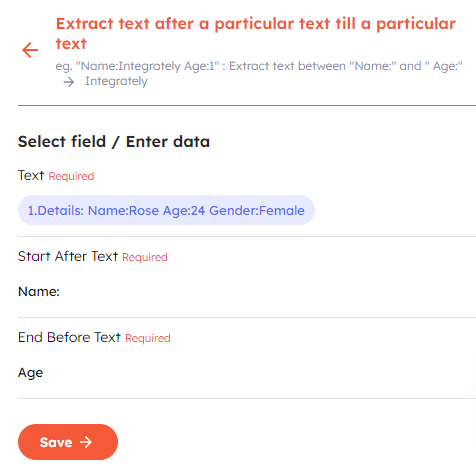
17. Extract text after a particular text till a particular text
Use this modifier to extract specific information from the incoming data (having multiple words). Just specify the words or symbols that Integrately should look for in the data and Integrately will extract the text accordingly. For example, if your incoming data has information about name, age,& gender, and you just need to extract name, then set the modifier as:

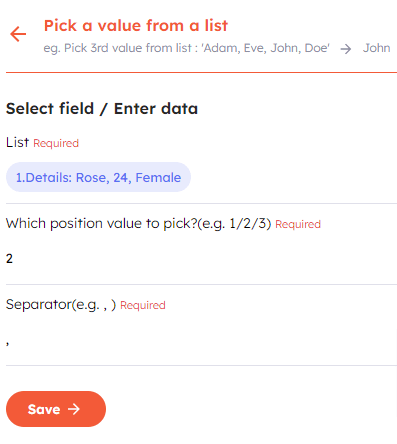
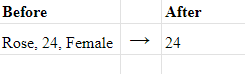
18. Pick value from a list
Use this modifier in scenarios where your incoming data has a list of values and you want one specific value from it. All you have to do is specify how the values are separated i.e the ‘separator’ and the ‘position of the value’ that you want to pick.
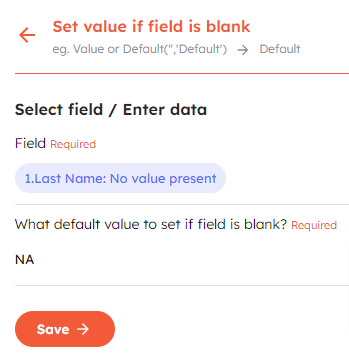
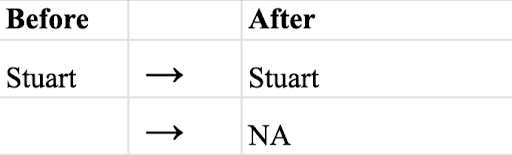
19. Set value if field is blank
Sometimes, a field in the incoming data might be blank/empty, but the destination requires it to be filled. That's where this modifier comes in handy. It helps fill in the blanks, ensuring that all necessary fields are completed, even if they were empty in the original data.
For example: if your destination app needs a 'last name', but the source only provides a first name. Without a last name, the destination won't create a record. You can fix this with the modifier by either:
- Setting a default value for the missing field, or
- Using another field as a backup default value. If the first field is empty, it'll use the value from the second one.
Number Modifier
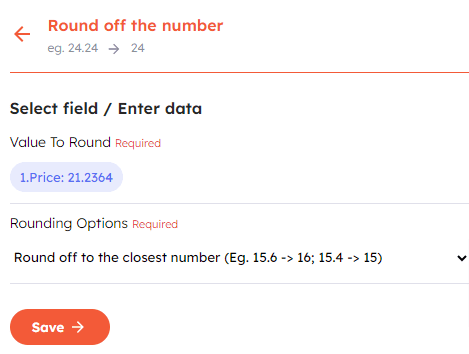
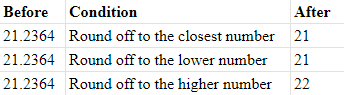
1. Round off the numberThis modifier helps you simplify decimal numbers, such as 21.2364, to more manageable whole numbers. Think of it like rounding off a grade to the nearest whole number on a test. With three rounding options, you can choose the one that best suits your needs, making it practical for scenarios like grading or categorizing data.
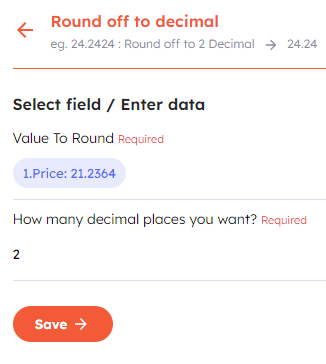
2. Round off to Decimal
Use this modifier to round off numbers to specific decimal places. For instance, imagine you are dealing with financial data where the amounts go up to several decimal places, like $21.2364. Rounding it to 2 decimal places using this modifier would make the numbers more practical and easier to work with, simplifying your financial records without losing significant precision.

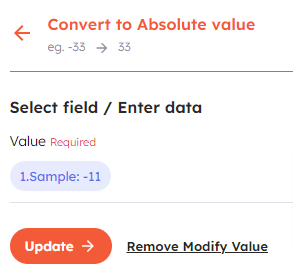
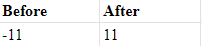
3. Convert to Absolute value
This modifier will convert negative numbers into positive before sending it to your destination app. For instance, if your incoming data includes a value like -11, applying this modifier would transform it into 11. This is valuable when you want to send only positive numbers to your destination app.
4. Format number according to country
If your contacts come from various parts of the world, each with its own phone number format, this modifier helps you adapt and present phone numbers according to specific country preferences. All you need to specify is the required format of conversion and country code of the phone number.
Note

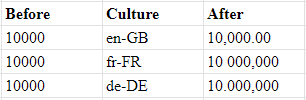
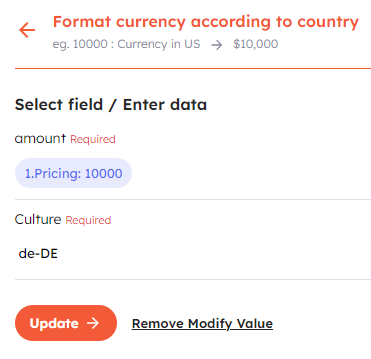
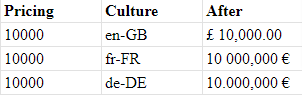
5. Format currency according to country
Use this modifier to present currency values in a standardized format based on country preferences.
Imagine having customers worldwide with diverse currencies, yet you aim to use a single currency like GBP for billing consistency. With this modifier, you can format currency values according to specific country preferences such as ar-SA, en-IN, fr-FR
Note
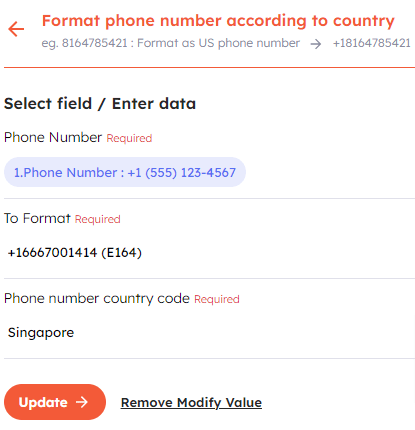
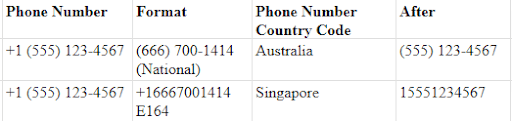
6. Format phone number according to country
Use this modifier to customize phone numbers based on country preferences.
If your contacts come from various parts of the world, each with its own phone number format, this modifier helps you adapt and present phone numbers according to specific country preferences. Whether it's +1 for the United States, +44 for the United Kingdom, or +81 for Japan, it ensures that your phone numbers follow the expected format for each country.
Note
You can find the Culture code and Country code for any country on Google. To see examples of these codes, check out the below documents:
- Google Culture Codes : They look like 👇

- Google Country Codes : They look like 👇

Important:You can update several fields at once. There's no need to go to each field separately and repeat the whole process. Make changes to all of them together.
Just click on the ‘Need multiple changes’ link and add the required modifiers
Exception: If you're using the same field for applying different modifiers.
Integrately lets you easily adjust the time and date in your automation. This is super helpful when you're connecting apps that use different time zones or date formats
For example, let's say your automation starts by creating a new event in a calendar app. The event time might be set in your company's local time. But if you need to share that event with a client in a different time zone, you can do so to match their location.
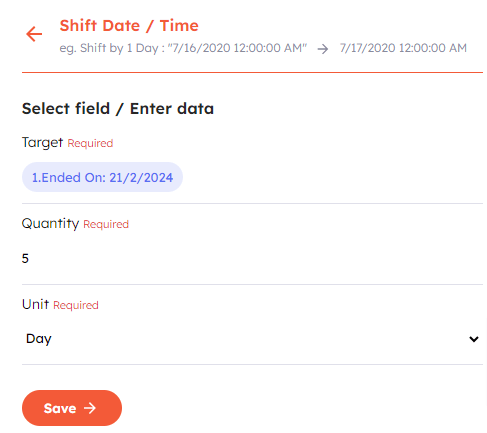
Date Modifiers
1. Shift Date/ TimeThis modifier helps you adjust dates. Suppose you want to follow up on a lead after 5 days of its creation, then this modifier can do so. Just provide the quantity and select the unit (in seconds, days, etc) by which you want to shift it.
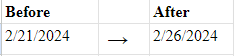
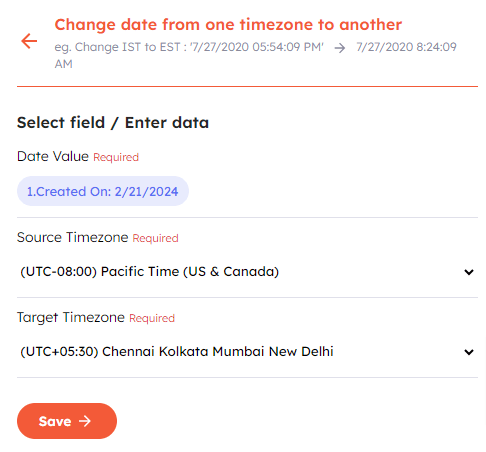
2. Change date from one timezone to another
When you're working with two apps that are set in different timezones, you might need to adjust the date and time data when transferring it from one app to another. This modifier will automatically convert the source app's time, initially considered as UTC, into the destination app's timezone.
For example:If you're moving a date from an app in Pacific Time (PT) to another app in Indian Standard Time (IST), the modifier will ensure the time is correctly adjusted and displayed in the destination app as per its timezone setting.

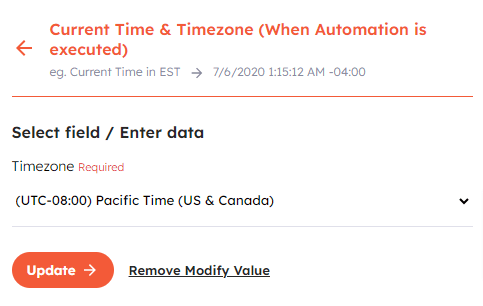
3. Current Time & Time Zone (When Automation is executed)
This modifier allows you to use the current time and time zone when your automation runs. Think of it like a snapshot of the current moment in time.
Example: Suppose you have an automation that sends a daily report at the current time. If the automation runs on July 6, 2020, at 1:15:12 AM in the Eastern Standard Time (EST) zone, this modifier will capture that exact time and time zone and send it accordingly.

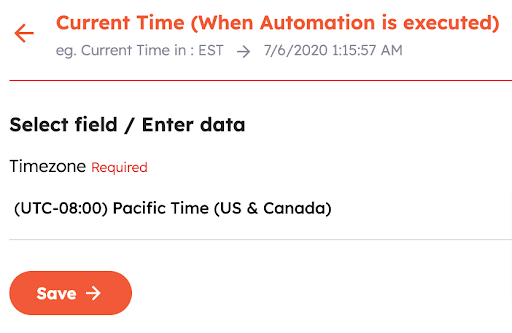
4. Current Time (When Automation is executed)
This modifier returns the current time when your automation runs. It's like taking a snapshot of the clock at the exact moment your automation is executed!
It is useful when you need to include the current time in your automation, such as in date and time calculations, or when you want to timestamp events or actions.
Example: Imagine you're automating a process that generates a daily report. You want the report to include the exact time it was generated. This modifier can be used to do that.

5. Change date time to specified format
There are apps that need date and time in a particular format only (like Google Meet needs it in yyyy-MM-ddTHH:mm:ss). In such scenarios, you can convert the incoming date time in the required format and then pass it on the app.
There are many date time formats like:
dd MMM yyyy --> 27 Mar 2024
ddd dd MMM yyyy --> Tue 27 Mar 2024
dd mm yy → 27 03 24


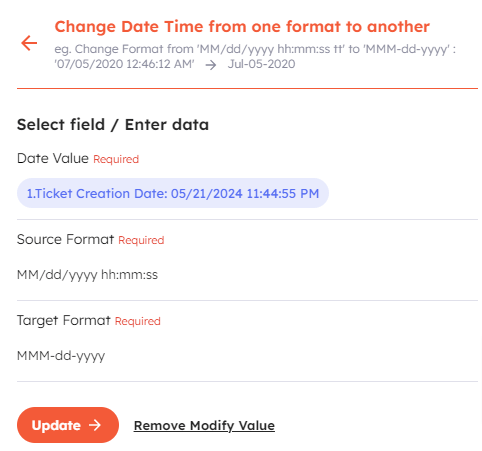
6. Change date time from one format to another
In cases where you are passing date time data from one app to another with both having different date time formats, then this modifier will do the needful.
All you need to do is provide the date and the formats of the source and the target app.

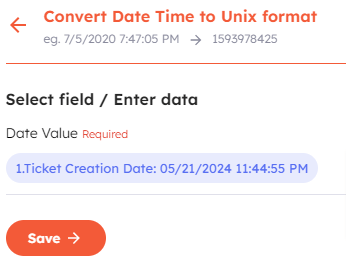
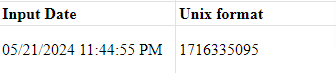
7. Convert Date Time to Unix format
Unix timestamp format represents dates and times as the number of seconds elapsed since January 1, 1970 (Unix epoch). This modifier converts regular date/time values into the Unix timestamp format.
Some applications and systems expect date/time data in Unix timestamp format for compatibility reasons. Use this modifier before integrating with those apps to ensure seamless data transfer.
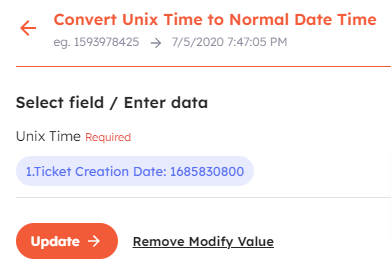
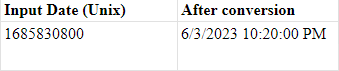
8. Convert Unix Time to Normal Date Time
Unix timestamps represent dates and times as the number of seconds elapsed since January 1, 1970 (Unix epoch). While convenient for some systems, this format is not very human-readable.
This modifier converts Unix timestamps back into a regular date/time format.
Example: If you receive date/time data in Unix timestamp format from an application (say server logs) , use this modifier to convert it into a more readable format before displaying or using it in your workflows.
Integrately has 1100+ apps available in its directory which includes almost all your popular and widely used apps.
But, if an app you want to connect to isn’t available in our list yet, then you have the provision of Webhook/API app. It helps you integrate with any application or service that provides an API or webhook URL.
The Webhook/API app acts as a bridge, allowing you to connect to third-party applications or services that are not directly supported by Integrately.
You can use it to -
- Send data to any application
- Receive data from any application
Where to find the Webhook/API app in Integrately
Just search in the app list as you do for other apps:
How to use the Webhook/API app
Prerequisite: The app that you wish to connect with Integrately using Webhook/API must have an API documentation publicly available to users.
There are 2 ways to use the Webhook/API app:
- Webhook/API app as the trigger app
Use Webhook/API as the trigger app when you want to receive the data from an external application into Integrately.

To connect Integrately with your application, you need to follow the instructions given -

Example: Set up a webhook that will receive the manual time entry done in ‘Clockify app’ and add it to Google Sheets.
- Webhook/API app as the action app
Use Webhook/API as the action app when you want to send the data from Integrately to an unsupported application.

Note: Carefully read the API documentation to understand which action to use for the desired result.
While sending data to other apps, you need to select the method of sending it , which can be any of the following depending on your requirements:
- POST: To create or update the data or records
- GET: To search or read the data or records
- PUT: To update the data or records
- PATCH: To partially update the data or records
- DELETE: To soft delete/delete the data or records
- HEAD: To get information about data without actually getting the data itself
- OPTIONS: To find out what kind of actions you can perform on a piece of data

Example: Setup a webhook that will send the data to Companyhub CRM for each new row created in Google Sheets
Building automations in Integrately is easy indeed. You can connect your favorite apps and automate repetitive tasks.
But, what if you want to perform the automation on a list of records?
For example, imagine you run an online store and want all your Zoho Books purchase orders to be stored in Airtable in bulk.
Setting up separate actions for each purchase order would be time-consuming and impractical, right?
Well, not when you have an iterator!
Iterator in Integrately is like having your own assistant for handling lists. It acts like a smart pointer that goes through your list, one item at a time, similar to how you might work through a grocery list, checking off items as you proceed.
Let’s now understand how to set up an iterator considering the above example :
- Connect the required applications (in this case Zoho Books and Airtable)

- Select your Trigger and Action

- Login to your accounts and switch to the 'Automation Builder'

- Right below the trigger, you can see the option to - add a filter / condition / app. Click here and select the Iterator option.

- Once added, select ‘Line Items’ from the incoming record from Zoho Books and click on ‘Test’

- Next, add the Airtable app inside the Iterator and select the required action

- Next, you need to map the required fields.
Imp: Map the fields using the output generated from the iterator (in this case Name, Quantity and Amount). In case you map the fields from other apps then you may not get the desired output.

- Once your automation is set up, remove the step 4 (that was added when you selected the trigger and action) as it falls outside the iterator’s scope.
- That’s it! Click on the ‘Done! Let’s test it’ button and turn on your automation!

Output in Airtable

There are automations that need not be executed instantly, rather they need a break of maybe a few minutes/hours/days or even more.
This is where Delay from Integrately comes in. Think of it as a built-in pause button for your automations, allowing you to schedule specific actions for later or introduce strategic breaks between steps.
You can use it for setting up automations like:
- Sending a follow-up email to a new lead after 24 hours
- Adding a lead to a CRM after 72 hours
- Creating a task after 14 days
- Posting a tweet after 1 hour
- Creating a ticket after 2 days, and much more.
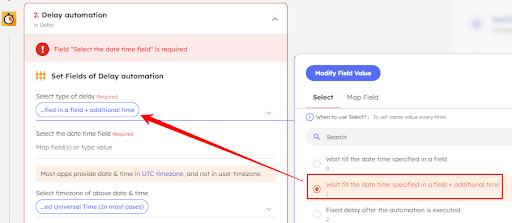
Integrately provides 3 types of Delay options:
- Wait till the date-time specified in a field
- Wait till the date-time specified in a field + additional time
- Fixed delay after the automation is executed
Type 1) Wait till the date-time specified in a field:
This Delay option lets you delay the tasks until a specific date and time that's already stored in your information.
Example: A rental agency might use this delay to ensure a smooth tenant welcome. They can set their automation to wait until the "Move-In Date" listed in the lease agreement before automatically sending a welcome email with important information for new tenants.
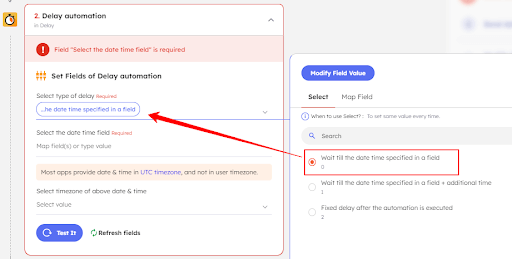
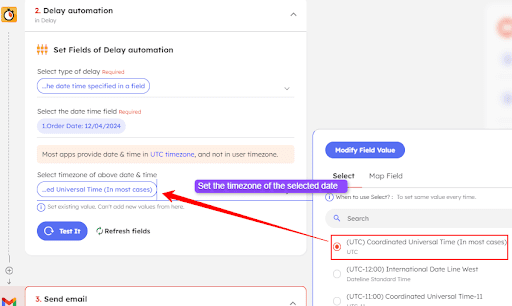
To use this type of delay, you need to set "Date time field" and "Time Zone" in the automation builder.
It is the UTC timezone in most cases, however, you can change it to any desired timezone.
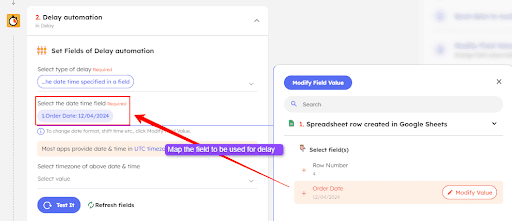
Type 2) Wait till the date-time specified in a field + additional time:
This option lets you hit the snooze button on your automation!
Example: You run an e-commerce store and want to send discount coupons to customers after they purchase a product. With this option, you can wait until the "Order Date" from the purchase record, plus an additional delay (e.g., 7 days). This lets you send the coupon a week after the purchase, giving the customer time to enjoy their new item before receiving another offer.
It's a great way to refine the timing of your communication and tailor it to specific situations.
For this Delay, you need to set the "Date time field" and "Time Zone", then specify the "Additional delay" as shown below. You can specify the "additional Delay" in weeks, days, hours, and even minutes. Furthermore, you can also add a Negative Delay.
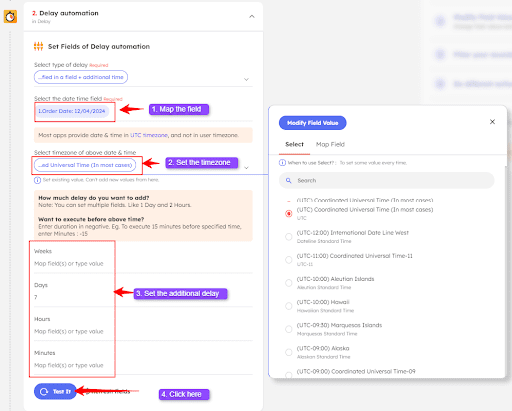
When to use a Negative Delay
If you want to trigger a task before the date and time specified in a field, use a Negative Delay. The duration of delay can be set to negative by prefixing the "-" (minus) sign with the number.
Example: To give your team a reminder 30 minutes prior to the planned meeting time, specify -30 in the "Minutes" section. Your team will automatically receive the reminder 30 minutes before the specified time in the app field.
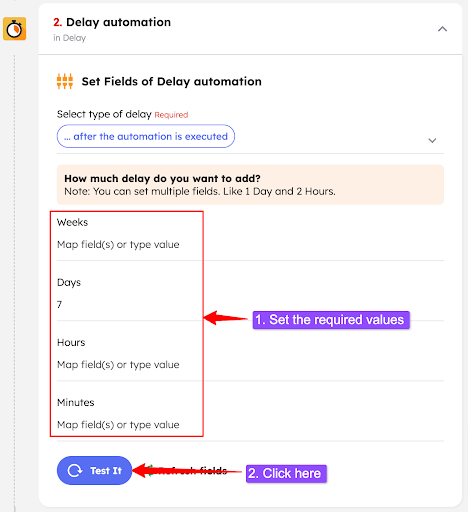
Type 3) Fixed delay after the automation is executed
This option is like a built-in timer. You can directly choose the delay duration in weeks, days, hours, or minutes.

Example: Your customer service spreadsheet tracks support tickets. You can set a fixed delay to send an automated "case update" email 1 day after a new ticket is created.
You need to specify the delay time for your task in the automation builder as shown below. You can also set multiple time fields, like 1 week, 3 days, 2 hours, and 30 minutes.
How to set up Delay in the automation workflow
To automate workflows using Delay, perform these 3 simple steps:
- Step 1: Choose your apps
Select the required apps, trigger (eg: a Google Sheets trigger), action (eg: send email in Gmail), and add it to your automation .

- Step 2: Set up your automation using Delay
Once your trigger and action are set, switch to ‘Automation Builder’ and click on the ‘Add filter/condition/app’ button at the position where you want to add the delay.
Then, search for and add the delay app.

The sequence for adding the delay is: Trigger App + Delay + Destination App
Next, you need to test and Activate your automation.

- Step 3: Check the automation History
Once your automation is live, head over to the "History" tab to check whether it is working as intended.
The green tick symbol denotes a successful execution of the intended action after the specified time has passed, while the glass hour symbol indicates the delay is still ongoing.
The action will automatically perform after the stipulated time. Following its execution, a Green tick symbol will appear along all the automation stages as shown below.

Sometimes, you want to schedule your automation tasks for a specific date and time and that’s what Integrately’s Scheduler is made for.
As the name suggests, it is an application that schedules tasks or processes to run at a specific time or interval or when a certain condition is met.
It helps you automate the execution of tasks or processes like running scripts, sending emails, performing backups, etc.
Examples of using Scheduler:
- Publish a social media post at 8:00 AM for maximum engagement.
- Send an automated invoice on the first day of each month.
- Trigger a customer satisfaction survey a week after a purchase.
- And countless other possibilities!
How to set up the Scheduler?
Let us understand how to set up a Scheduler with the help of an example: A manager needs to conduct a review meeting on the 30th of each month.
You can schedule this process to -
- Run on the 30th of every month,
- Create a meeting in Google Meet, and
- Send an email, using Gmail, about the same to the required members
To do so, simply follow these steps
- Set ‘Scheduler’ as the trigger app and select the action app (in this case Google Meet)

- Select the trigger and action, and proceed

- Set the frequency for the ‘Scheduler’
Frequency is the interval at which your task or process is to be executed. In our case, we will set it to a month as we must execute the task on the 30th of each month.
- Connect your action app account and proceed to Automation Builder by clicking on the ‘Add or Modify Steps’ button.

- Set the fields for Scheduler

- Map the fields for your action app (in this case Google Meet) from your Scheduler

- Now, you need to add the next app in your automation workflow (in this case Gmail),

Select the action, connect its account, and map the fields

- That’s it! Now, test all your steps and set the automation LIVE!

Schedule once and rent-free your mind of mundane tasks and processes. The automation will run on the intended time and you can check it in the History.
Once the automation runs, the emails will be sent to the corresponding members.

AutoRetry is your safety net for failed or misconfigured actions.
It is a helpful feature that automatically tries to run a failed action again after a set time. It keeps trying for up to 10 hours or until the action works successfully.
AutoRetry helps in several situations where things might go wrong:
- API Issues: Sometimes, the connections between different apps (called APIs) can fail due to internet problems. This isn't anyone's fault, but AutoRetry can help by trying again until it works.
- Service Outages : The apps you're connecting might temporarily stop working. AutoRetry will keep trying to connect even if one app is briefly unavailable.
- User Input Errors: If someone makes a mistake when filling out a form or uploading a file, AutoRetry can help catch these mistakes by trying the action again.
- Automation Setup Issues: Even if you've set everything up correctly, sometimes small problems can occur. AutoRetry can help identify and overcome these issues by repeatedly attempting the action.
If a step in an automation fails with (rate limiting errors, downtime errors or other transient issues), Integrately will retry the step up to 5 times. While AutoRetry is active:
- No error emails will be sent.
- You cannot manually replay the task from history.
- You can see when the step was last autoretried from history. It is indicated by Last Attempt on field
Automation runs that are being autoretried (or scheduled) show up as "Scheduled for AutoRetry" in History.
- First retry: After 5 minutes
- Second retry: After 30 minutes
- Third retry: After 1 hour
- Fourth retry: After 3 hours
- Final retry: After 6 hours
For example, if something fails at 2:00 PM, AutoRetry will try again at: 2:05 PM, 2:35 PM, 3:35 PM, 6:35 PM, and finally at 12:35 AM the next day.
This means AutoRetry keeps working for about 10 and a half hours after the first problem occurs.
If you edit your automation while AutoRetry is working:
- The next retry will use your new settings.
- This lets you fix problems that might be causing the errors.
When you turn on your automation after making changes:
- AutoRetry will try again for most errors that happened in the last 24 hours.
- It won't retry errors caused by outages or API issues.
- This gives you a chance to fix problems and have AutoRetry test your changes.
Before each retry:
- AutoRetry checks if your automation and AutoRetry are both on
- If either is off, it stops all future retries
You can turn your automation off and on between retries:
- This won't interrupt AutoRetry
- Just turn it back on before the next retry is due
If AutoRetry still fails after 10 hours:
- You'll get one email about the error
- This is the only error message you'll receive if you have turned on AutoRetry
To activate the Auto-retry feature, just follow the below steps:
- Click on ‘My Automations’

- In the upper right hand corner, click on ‘History’

- Inside ‘History’ you will be able to see the ‘AutoRetry’switch. Click to toggle AutoRetry switch to turn it on.

Please Note:
- Only account owners can turn AutoRetry on or off.
- When an owner turns it on, it works for their whole company.
- We recommend keeping AutoRetry on all the time. This way, you don't have to worry about failed actions in your integrations.
Important: You need a Professional or higher plan to avail the feature of ‘AutoRetry’
If you're experiencing issues connecting your accounts with Integrately, several factors might be causing the problem:
- Subscription Plan Limitations: Your current plan may not allow access to API credentials.
- Incorrect API Credentials: The API credentials entered might be incorrect.
- Password Changes: Recent changes to your app passwords could affect the connection.
- Auto-Saved Credentials: Incorrect auto-saved login credentials might be used in the API fields.
- Network Issues: Connectivity problems or firewall restrictions might be preventing the connection.
- Outdated Integrations: The app integrations you're using might be outdated and need to be updated.
- Permissions: The app(s) you're trying to connect might require specific permissions that haven't been granted.
- Service Outages: The app(s) or Integrately might be experiencing temporary service outages or maintenance.
- Browser Cache: Cached data in your browser might be causing issues. Clearing your cache could help.
To resolve these issues and successfully connect your accounts with Integrately, please check and update your credentials and settings as needed.
When setting up a workflow in Integrately, each step needs to be tested to ensure it functions correctly. If there are any issues, an error notification will appear during the testing phase.
In many cases, you will receive either:
- A detailed error notification, or
- A 'How to Fix' button that provides a step-by-step solution
You need to address these errors before proceeding. Common reasons for these errors include:
- Compulsory (*) field left unmapped
- Mapped field is empty at the source
- The test record does not exist any more
You've followed all the steps, but your automation is still not delivering the expected results. Here are some common reasons why your automation may be failing:
- Incorrect Field Mapping: The fields may not be mapped correctly.
- Improper Data Format: The data being sent to the app is not in the correct format.
- Empty Required Fields: A required field may be empty.
- Authentication Issues: Authentication may have failed, requiring you to authenticate again.
- App Downtime: The app might be down.
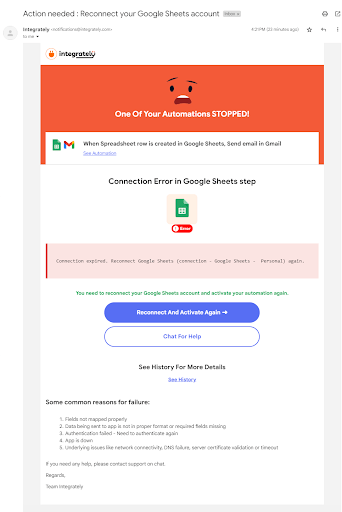
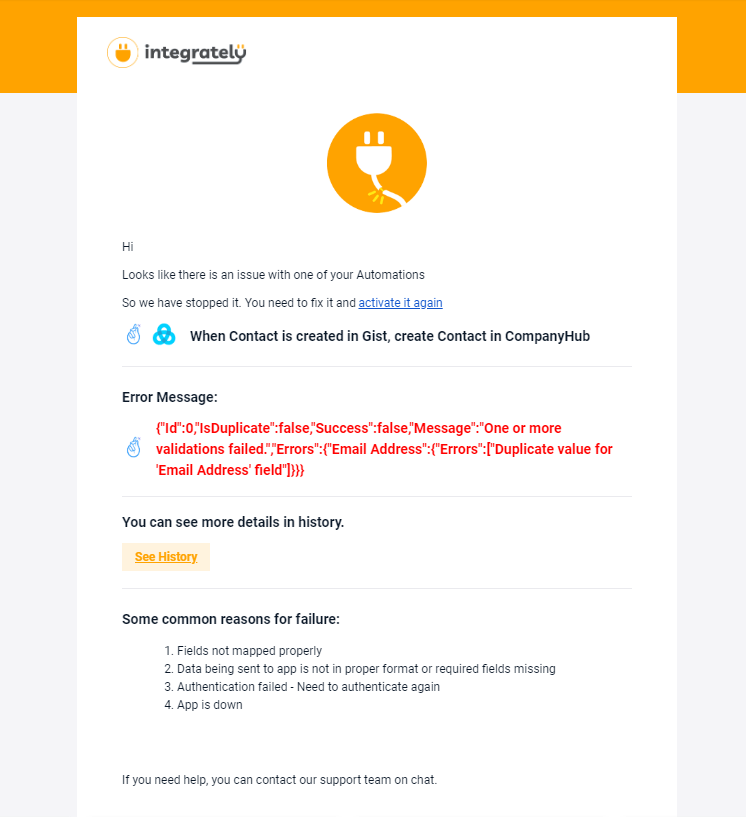
To identify the error in your automation, check the ‘History’ of your automation. It will display an error message along with the specific reason that caused the error.
For added convenience, Integrately will also send you an email detailing the issue.
Prerequisite: A phone number never registered with any type of Whatsapp (Personal/Business) or with Meta.
Step 1 : Creating an app in Meta (Facebook) and set up the cloud API in Meta
To do so:
First, login to your Meta (Facebook) account that you want to use for creating your apps.
Next, visit https://developers.facebook.com/
Click on the ‘My Apps’ button at the top.

Click on the Create App button

- choose Business
click on Next

Next, provide the following details about your business:
- Display name used for your business
- Email-id for your communication, app recovery etc
- Business account (optional) : your Facebook account used for business. In case you don’t have one, it will be created automatically.
After adding the details 🠞 click on Create app

Enter your Facebook password and click on Submit

Now search for Whatsapp 🠞click on Set up

In the next step, select the Business account that you want to use (in case you don’t have an account, Facebook will automatically create one for you). Click on Continue.

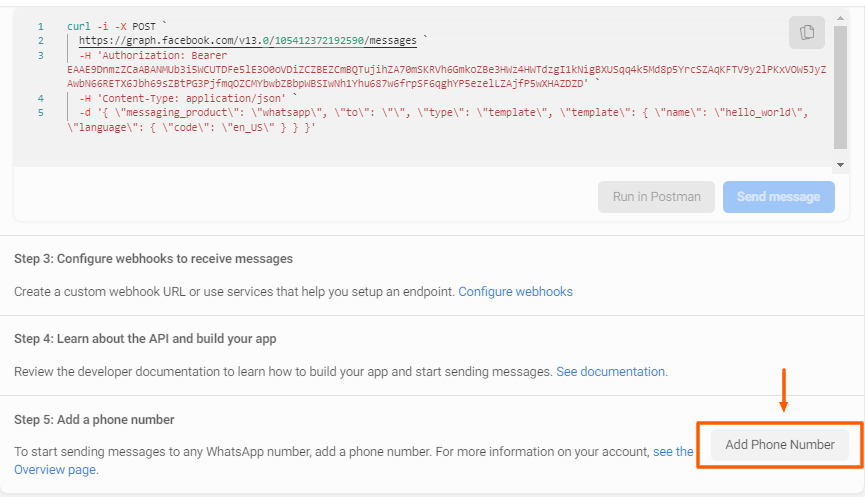
You are now presented with a screen where you can add the phone number.
Step 2: Adding your Phone Number
Scroll down to the bottom and click on the Add Phone Number button.
Note: Use A phone number never registered with any type of Whatsapp (Personal/Business) or with Meta.
Fill up your following business details:
- An appropriate Display name
- Your corresponding Timezone
- Your Business Category
- A short Business Description
Click on the Next button

Next,
- Select your corresponding ISD code
- Add your Phone number
Click on the Next button for verification

You have now configured a phone number for your Whatsapp.
Now that you have created your app and verified the phone number, next you need to configure a URL to receive all the incoming messages for this number.
Step 3: Configuring the Webhook
To do so, follow these steps after logging into Integrately:
Select ‘WhatsApp’

Select the other app you wish to integrate with WhatsApp.
For example, Google Sheets can be used to save all the incoming messages in WhatsApp. Select the trigger
- Select the action
Click on Go

Click the COPY button to copy the URL

Go to your Meta/Facebook developer account.
Go to My Apps

Select your app.

Select Whatsapp -> Configuration (from the left hand menu)

Next,
Click the Edit button in the Webhook section

Paste the URL in the Webhook's callback URL section.
Enter a token for verification. (You can write anything here - xyz/abc)
Click on Verify and Save.

Next,
Click on the Manage button

Subscribe for messages

Click on Done.Check if received. button. This checks for a test record from WhatsApp.

You are now ready! Head back to Integrately and proceed with setting up your automation.
Special Notes
Message Types : Currently, the following message types are supported by WhatsApp API:
Text
Audio
Video
Document
Image
Contact
However, it DOES NOT support :
Hybrid messages - a text along with image

Multimedia messages with more than 1 media files in the message

Also, the URLs that you use for sharing images/audio/video/document must be publicly downloadable URLs.
Message Templates: Meta (Facebook) provides the following types of message templates Text-based message templates
Text-based message templates
Media-based message templates
Interactive message templates
Each category has some predefined templates provided by Meta (Facebook). If you use any of these templates, then the message is directly sent to the receiver.
But in case you want to create your own template and share it then you first need to create one on the Meta (Facebook) platform. To do so, follow these steps:
Visit -> https://business.facebook.com/wa/manage/message-templates/
Click on Create Message Template button

Fill up the following details
Category: You need to select from the 12 categories available currently
Name: Template name
Language: Select the languages that you want for your message
click the Continue button

Next, Set up messages for all the languages
Click on the Submit button.

You can add details for the :
Header - Title
Body - Message to be sent
Footer - Gets added at the end of the message
Buttons- Used for call to action
Preview your messages on the right hand side as you fill in the details.
Once submitted, wait for Facebook’s approval. Post approval, you can start using the template.
- Sending Templated messages: When you use the Send message from template in WhatsApp Cloud API action, Integrately helps you deliver templated messages to the intended receiver..
- Sending Custom messages: When you are sending a message using the Send message in WhatsApp Cloud API action, it is a prerequisite that you have received at least one message from the intended receiver. First time recipients will not receive your messages delivered using this action.
FAQs
Can we use our current WhatsApp number?
No, you cannot use your current WhatsApp number that is already registered and in use.
Can we send messages to groups?
No, you cannot send messages to groups. You can only send it to individuals.
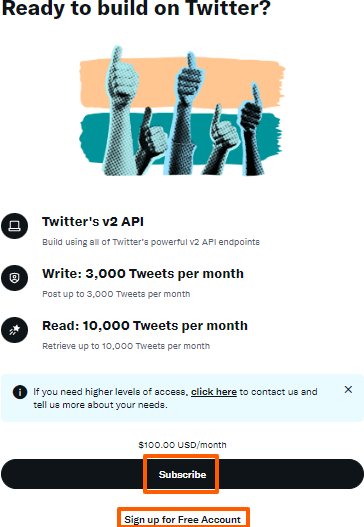
IMPORTANT: Twitter’s Free Plan only supports posting tweets. All other features require it’s paid plan.
| Twitter’s Free Plan | Twitter’s Basic Plan ($100/mo) |
|---|---|
Triggers:
| Triggers:
|
Actions:
| Actions:
|
A. Create Twitter Developer Account (Don’t worry, no code)
If you already have a developer account, skip this part and jump to B. How to get ‘Client ID’ and ‘Client Secret’
Step 1 : Visit https://developer.twitter.com/ and Signup for the Free or Paid plan.
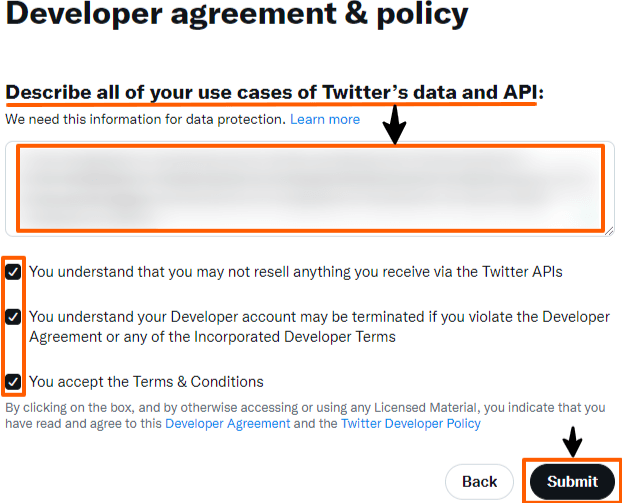
Step 2 : After signing up, you need to describe your intended use of Twitter's API (in 250 or more characters).
Here are a few examples for your reference:
- Automate my social media marketing with the help of Twitter API
- Use ‘Create Tweet’ and ‘Create Tweet with poll’ actions to post tweets
- Perform desired actions when a tweet is created
- Use other triggers and actions to streamline my social media management efforts
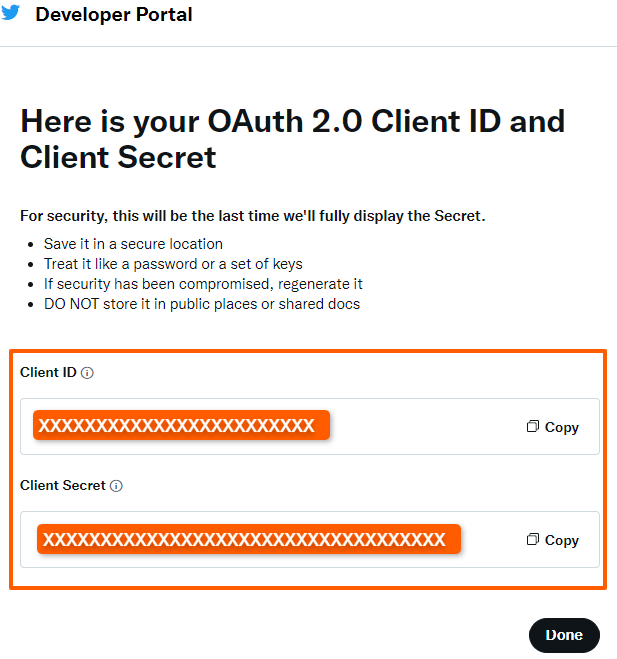
B. How to get ‘Client ID’ and ‘Client Secret’
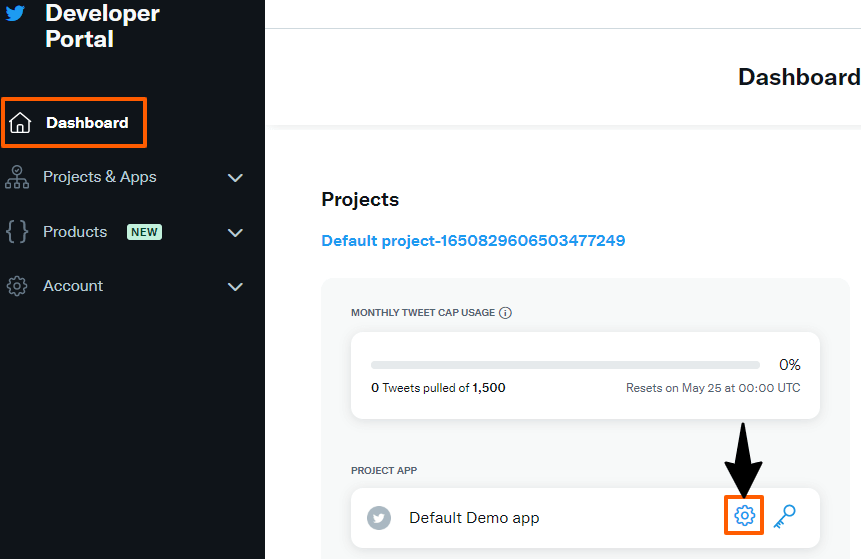
After creating a developer account, you will be redirected to the Twitter Developer Portal Dashboard. To get the ‘Client ID’ and ‘Client Secret’ you must follow these simple steps:
Step 1 : Click the App settings ‘⚙️’ icon for your default app as shown below
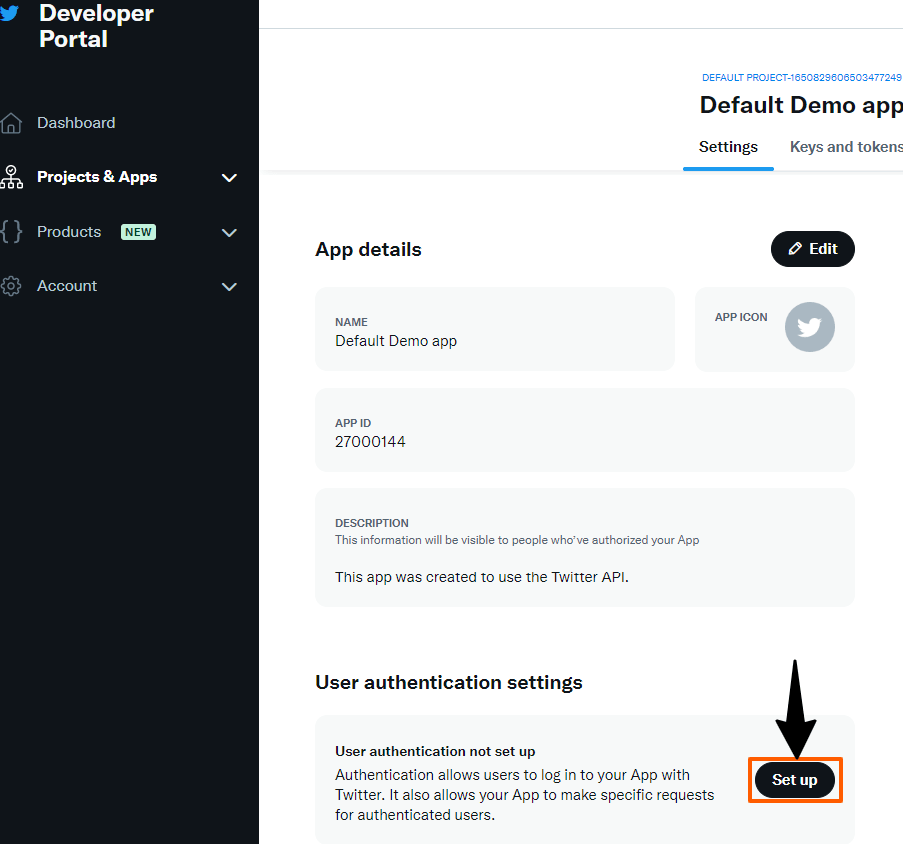
Step 2 : Click on the ‘Set up’ button under the ‘User authentication settings’
Step 3 : To set up user authentication, select the following

Step 4 : Fill in the following details:
Input ‘https://app.integrately.com/auth/Twitter/Authorize’ in the ‘Callback URI / Redirect URL’
Enter your Website URL
Input other optional details and click on ‘Save’

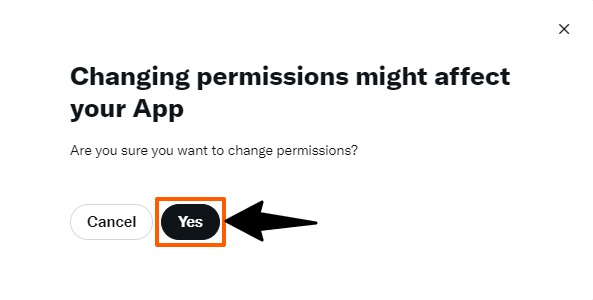
Step 5 : Click 'Yes' to proceed with the changes.
Step 6 : Copy the ‘Client ID’ and ‘Client Secret’ and save them for future use. Once you hit ‘Done’, you won’t be able to retrieve them again.
Prerequisite: OpenAI Account
Note: To connect OpenAI with other applications, you must setup a workflow involving at least 3 applications, with OpenAI acting as a middleman.
First App ➜ to insert input prompts for OpenAI.
OpenAI ➜ to generate a response for your prompt.
Second App ➜ to store/process OpenAI outputs.
Steps to connect your OpenAI account with Integrately:
Login to your Integrately account
Search and select your first app (trigger app)
For example, let's choose Google Sheets.

Next, you need to search for and select the OpenAI app (App 2)

Now, set up the desired Trigger for your App 1(Google Sheets) and Action for your App 2 (OpenAI)
In this case:
Trigger 👉When a Spreadsheet row is created in Google Sheets
Action 👉 Generate Image in OpenAI
Thus, when you add a new row in Google Sheets with a prompt such as "Create an image of an elephant", the OpenAI app will generate the image and provide a link to the created image as the output.
Note: The fields and parameters to be set for OpenAI vary according to the action.

Securely connect your App 1(Google Sheets) account.

Next, map the appropriate fields for App 1. (e.g., select the spreadsheet and worksheet for Google Sheets).

Now, securely connect your OpenAI account

Get the API key, by following the steps mentioned in this video 👇
Once done, a popup will appear asking if you want to add more apps/conditions/ branching. Choose `Yes` and proceed to the ‘Automation Builder’.

Map the fields for OpenAI and Test the connection for any errors by clicking on the `Test` button.

Now you have setup OpenAI to generate the required output. But we need to store/use this output further. To do so, we must add the next app in this workflow.
Click the `Add filter/condition/app` button and choose the required app (App 3)
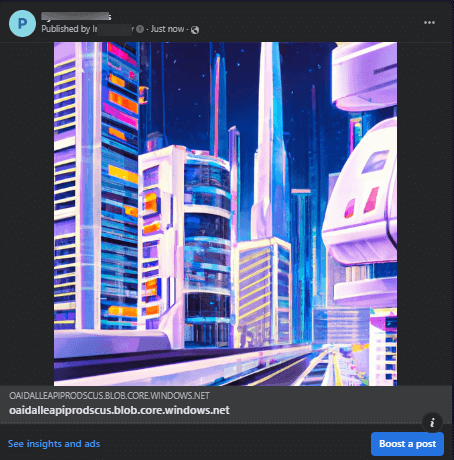
For example, let's choose to post the generated image on a Facebook page.

Select the Action to be taken.
In this case, the Action will be 👉 Create post

Securely connect your third app account (App 3)

Map the desired fields for App 3. Then click the `Test` button to check if everything works fine. In this case, we have mapped :
URL field from OpenAI 👉 Link field of Facebook Pages Post

Click the `Done? Let’s Test It` button.

Finally, click the `Test and Continue` button and then toggle the `Test & Turn ON` switch to make your automation LIVE!

Congratulations. You have successfully set up your automation using OpenAI.

Output in Facebook Pages:
If you are facing problem with connecting your accounts with Integrately, there could be several reasons for it:
- Your subscription plan does not support disclosure of API credentials
- Incorrect API credentials
- Changes in password of the app(s)
- Incorrectly sourcing auto-saved login credentials in API field(s)
You need to resolve any such issue(s) to facilitate connection of your accounts with Integrately.
If there is some in your automation, you will receive an error notification at the top while testing your automation. In that case, you won’t be able to proceed unless you have fixed the problem.
Now there could be a few reasons for such errors. These include:
- Compulsory (*) field left unmapped
- Mapped field is empty at the source
- The test record does not exist any more
You have done everything right up till now, but still not able to see the results of the automation? Well, let's look at some of the most popular reasons due to which the automation may be failing:
- Incorrect mapping of fields
- Data being sent to app is not in proper format
- Required field is empty
- Authentication failed - Need to authenticate again
- App is down
So how to recognize the error in the automation? For that, you need to check the ‘History’ of your automation. It will show an error message along with the field that caused the error.
For added convenience, Integrately will send you an email for the same stating the issue.
You can link the following types of Facebook accounts using Integrately:
- Facebook Pages
- Facebook Groups
- Facebook Custom Audiences
- Facebook Lead Ads account
- Facebook Conversions account
- Facebook Offline Conversions account
Note: To integrate Facebook Pages or Facebook Groups with Integrately, you must possess Owner or Admin privileges for these accounts.
Steps
To connect any of your Facebook Apps with other tools using Integrately, just follow these simple steps:
- Login to your Integrately account.
Choose the Facebook app that you wish to connect with another tool. For instance, let's say you pick Facebook Pages.

After picking your Facebook app, decide on the second app that you want to connect it with.

- After choosing both apps, you have two options:
- Use the ready-made, 1-click automations. OR
- Create your own custom automation. For this, you need to select a 'Trigger' and an 'Action'

Now, it's time to securely connect your apps with Integrately. To connect your Facebook Account, you'll need to log into the chosen Facebook App Account (Facebook Pages, in our example).

Enter your Facebook login credentials.

You will then be prompted to give Integrately permission to access your Facebook App.
Note: The type of permissions needed will depend on the Facebook App you're linking. For example, Facebook Pages will require 'page' permissions, whereas Facebook Lead Ads will need 'ad account' access.


Once you've granted the necessary permissions, your Facebook App will be linked with Integrately and you'll see a success message.

- Similarly, connect the account for the second app that you want to integrate.
After both of your app accounts are linked with Integrately, you can move forward to set up your automation and map the fields accordingly.

- Once done, click the `Test & Turn On` button and your automation will be live instantly!
Introduction
Running targeted ads on LinkedIn is a powerful way to reach business professionals.
But do you track what happens after someone clicks your ad?
Do they visit your website? Check your features page? Sign up? Submit a form? Register for an event?
You can easily track these conversion actions using Integrately.
But, let’s first understand how tracking conversions benefits your business.
Why do you need to track LinkedIn Ad conversions?
By tracking LinkedIn Ad conversions, you can
- See which parts of your LinkedIn ad funnel are working and which ones need improvement
- Focus your budget on ads that are driving real results and adjust your targeting or messaging accordingly
- Show the right ads to the right audiences
- Optimize your campaigns for better lead generation and ROI
- Save time in tracking data or compiling reports manually from multiple platforms
Which Ad conversion events can you track through Integrately?
Integrately helps you send conversions that happen post ad clicks directly to LinkedIn.
You can send conversions to LinkedIn from anywhere,
Your website
- Other apps from your funnel including
- Forms
- Surveys
- CRM
- eCommerce stores
- Payment processing platforms
- Accounting platforms, & more
These conversion events include (but are not limited to):
- Web page views & clicks
- Signups
- Form submissions
- Event registrations
- Purchases / Subscriptions
- Downloads, & any other key conversions
Tracking these valuable conversions gives you a clear picture of what's driving results for your business on LinkedIn.
How to send conversion events from website to LinkedIn
Note: Developer help is required to send website conversions to LinkedIn.
You can include a small piece of JavaScript code in Google Tag Manager or directly on the website. And you can start sending website conversions to LinkedIn using webhooks from Integrately. Use this detailed guide for reference.
How to send conversion events from other apps to LinkedIn
Before you start sending conversions, create a ‘Conversion Rule’ in LinkedIn Campaign Manager.
What is a ‘Conversion Rule’?
A ‘Conversion rule’ defines the user behaviors you want to track and attribute to your LinkedIn ad campaigns.
Follow these steps to set up a Conversion Rule in LinkedIn:
- Step 1 : Go to your LinkedIn Campaign Manager using the link 👇 https://www.linkedin.com/campaignmanager
- Step 2: Expand the ‘Analyze’ section in the left menu bar
Step 3 : Click on ‘Conversion tracking’ under the ‘Analyze’ section

Step 4 : Click on ‘Create Conversion’

Step 5 : Choose ‘Conversions API or CSV connection’ from the dropdown

Step 6 : Select ‘Direct API’ option under the ‘Conversions API integration’ source. Then click on ‘Next Step’

Step 7 : Fill out or set the following fields for your Conversion Rule:
- Name - Choose a clear name for your conversion action, like "Download Whitepaper" or "Free Trial Signup." This helps you identify it easily later.
- The key conversion behavior you want to track - Select what counts as a conversion.
- Value of the conversion (Optional) - If you track a monetary conversion, add its value.
- Timeframe for when you want the ‘Clicks’ and ‘Views’ to be counted
- Attribution model - For users who convert after viewing multiple ad campaigns, choose whether you want to attribute the conversion to the last campaign viewed or across all viewed campaigns.

Step 8 : Associate this rule with all relevant campaigns by selecting them. Then, click on ‘Create’

After setting up a ‘Conversion Rule’, create an automation in Integrately to send conversions directly from other apps to LinkedIn.
Step 1 : Head over & log in to Integrately. (https://app.integrately.com/login)
Step 2 : Select LinkedIn Ads & the app you want to track conversions from.
Step 3 : Choose the conversion event you want to track as your trigger & select ‘Send conversion event in LinkedIn Ads’ as action.

Step 4 : Follow the prompts to securely connect your LinkedIn Ads and the other app account with Integrately.

Step 5 : Map the data captured by your trigger app to the corresponding fields in LinkedIn Ads.

Step 6: Test and activate your automation : Once everything's mapped correctly, run a test to ensure data flows smoothly. If the test is successful, activate your automation to start tracking your conversions automatically.
Once you set up the automation, you can view your conversion tracking data directly in your LinkedIn Campaign Manager. This will give you valuable insights into your campaign effectiveness and help you optimize your ad spend.